Wednesday, October 1, 2008

Breaky in 10 mins


Muffin is the most easy thing to bake. It's always volatile, and it can be either savoury or sweet.
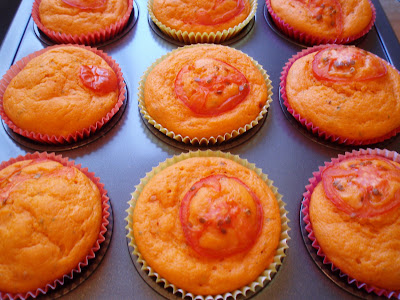
This is my first savoury muffin, and it only took me 10 mins to prepare and ready in 20 mins time. Perfect for a breakfast on the bed, breakfast on the go, or whatever you like. This is actually a tomato and basil muffin, the classic italian muffin, but i don't have any basil, instead i have a bunch of chives sitting in my fridge, so the tomato and chives muffins are born!!
I'm sure if i have some cheese i would throw them in the muffins too. ( these are really volatile recipe!!)


Tomato and Chives muffins

Ingrediants:
  • 1 bunch of chives, finely chopped.
  • 320g plain flour
  • 2 tbsp baking powder
  • pinch of salt
  • 4 lightly beated eggs
  • 125ml olive oil
  • 320g tin condensed tomato soup ( campbell would work beutifully )
  • 3 tbsp sun-dried tomatoes ( i use fresh tomatoes )
Method:
  1. Preheat the oven to 175 degree celcius. Grease a 12 cup muffin tin, and line it with muffin cases.
  2. in a bowl, mix the chinvces, flour, baking powder and salt with a spoon.
  3. in a large jug, combine the eggs, olive oil, and soup with a whisk, until well combine.
  4. Mix the flour mixture into the soup mixture until just combine. ( do not over mix )
  5. Spoon the mixture into the muffin cases, top them with slices of fresh tomatoes.
  6. Bake in the pre heated oven for 20 mins.
  7. When cook, remove the muffin from oven and let it cool for 5 mins, best serve warm.

Twisted Cheese


I love cheesecakes but they can be a bit troublesome to bake, with the biscuit base and leave it to cool overnight etc etc...
so, when i came across this chocolate cheese cake with a twist, which do not invovled the biscuit base and the cooling overnight etc ect, i decided to give it a go!
It's actually a very simply cake, substituting butter with cream cheese. Resulting a in a very moist chocolate cake. I frost it with chocolate frosting and decorate it with choppen pecans.

Chocolate CheeseCakes
Ingrediants:
  • 125g cream cheese
  • 60g butter
  • 1/2 cup caster sugar
  • 1/2 cup firmly packed brown sugar
  • 1 egg
  • 1/2 cup choppen peacans
  • 3/4 cup milk
  • 1 cup plain flour
  • 1/3 cup SR flour
  • 2 tbsp cocoa powder
  • 1/2 teaspoon bicar soda
  1. Preheat oven to 180 degree celcius
  2. Grease a 20cm (8 inch) spring foam cake tin and lined with baking paper
  3. Beat cheese, butter, sugar and egg with electric mixer until light and fluffy.
  4. Stir in nut and milk
  5. Sift all the dry ingrediant together for 2 times and add into the cake batter.
  6. Spread the mixture into pan.
  7. Bake for about 50 mins, or until cooked.
  8. Cool in pan for 15 mins and then cool on wire rack for at least 1 hour, or until completely cooled before frosting.
Chocolate Frosting
  • 1/2 cup cream
  • 100g dark chocolate
  • 60g butter
  • 1 cup icing sugar
  1. Combine the cream, chocolate and butter in a bowl and melt it over a saucepan of boiling water, gently stir with a woodern spoon until they are melted and combine.
  2. Cool the chocolate sauce slightly, and then beat in the icing sugar until smooth.
  3. Spread on cooled cake, decorate it with anything you like..


The cake before frosting and after frosting


I make this cake for the youth group, and i didn't get to try it, but feed back were that it's very good and some thought it was store bought. So, i think it should be nice **

Wednesday, September 24, 2008

Marble Effect

I'm in the mood of baking something chocolaty with the block of dark chocolate that i bought from IKEA, so, the marble cake from Dnnoa Hay Chocolate COoking book caught my attention, and i decided to give it a try.
This cake indeed have a very pretty marble effect, and it's very very delicious and moist!!

Marble Cake

Ingrediant:
  • 250g Butter, soften.
  • 11/4 cups caster sugar
  • 1 teaspoon vanilla extract
  • 3 eggs
  • 2 1/4 cups SR flour
  • 3/4 cup milk
  • 4 tbsp cocoa powder, sifted
  • 3 tbsp extra caster sugar
  • 1 1/2 tbsp milk
Method:
  1. Preheat oven at 180 degree celcius. Grease a 22cm bundt tin with melted butter.
  2. Place butter, sugar and vanilla in a bowl, and beat until light and creamy.
  3. Add tge eggs, one at a time, and beat well.
  4. Fold through flour and milk.
  5. Divide the mixture in 2, stir cocoa, extra sugar and milk through one of the portion.
  6. drop alternate spoonfuls of plain and chocolate cake mixture into the tin, and swirls with a skwer.
  7. Bake for 45-50mins, until the cake is cooked.
  8. Cool on a wire rack, and when cooled, frost the cake with chocolate glaze.
Chocolate Glaze:
  • 150g dark chocolate, chopped
  • 1/2 cup cream
Method:
  1. Place chocolate and cream in a saucepan over low heat, and stir untul melted and smooth.
  2. Allow the mixture to stand for 10 mins to thicken slightly.
  3. Pour the glaze over the cooled cake.

Little is MORE


Recently, i have the honour of baking a batch of 100 cupcakes for a friend's wedding refreshment.
I'm very excited as i love baking cupcakes, or more precisely, i love decorating these little cakes.
First thing, is to decided what flavour the cupcake base will be, so, between the basic vanilla and chocolate, i decided to do something more special, since it's a spring wedding, i decided to do a summer flavour base cupcake, and frost them with tangy cream cheese frosting.
I actually make about 150 more mini cupcake, and decorated them in 4 diffrent style.


these cupcakes is so easy to bake, anyone should try it, as you only need to dirty 1 bowl, and you do not need to beat the sugar and butter, everything can be done using a hand whisk!!

Orange Cupcakes


Ingrediant:
  • 2 cups SR flour, sifted.
  • 3/4 cup castor sugar
  • 1/2 cup orange juice
  • 1/4 cup milk
  • 125 g butter, melted and cooled
  • 2 eggs, lightly beaten
  • 2 tbsp orange blossom water ( or orange essence )
  • 2 tbsp of orange zest
  • handful of white chocolate chips ( optional )
Method:
  1. Preheated oven at 200 degree celcious. Line two 24 holes mini muffin pan with colourful paper cases.
  2. combine melted butter, orange juice, milk , eggs, orange water and zest in a jug. Whisk to combine.
  3. In a bowl, combine flour and sugar, and make a well in centre.
  4. Pour the butter, milk mixture into the flour sugar mixture, stir with a ballon whisk until all just combine. Stir in zest and white chocolate chips.
  5. Put one teaspoon of the batter into the prepared paper cases. Be careful to only fill it half way, other wise the cake will over flow!!
  6. Bake in pre-heated oven for about 12 mins.
  7. Cool on wire rack.
  8. Frost and decorated them once cooled.
( the above recipe will produce about 48 cupcakes )

Cream Cheese Frosting
  • 125 g butter, soften
  • 250g cream cheese, soften
  • 4 cups pure icing sugar
  • 2 tbsp orange blossom water
  • food colours
Method:
  1. Beat everything except the colours together until it tripple in volume.
  2. divide the frosting into saperate bowl, and dye them with your choice of food colour.
  3. put in the fridge for 10 mins before frost them on cooled cupcakes.
( the above frosting is more than enough to frost 150 mini cupcakes )


Saturday, September 20, 2008

"The" Cake


Lot's of people tell me that it's not easy to bake a chiffon cake, in fact, it's "the"cake, that if you master, you could basically pass as a cake baker. I didn't took those saying seriously of course, what could be so difficult? Chiffon cake is just ordinary and cheap cake that you can easily buy from Aisan shop!! SO, i decided to give this cake a try, and search high and low in the internet for a good recipe, and finally, after reading extensively on how to succeed in chiffon cake baking, i'm ready to bake.
However, it's very diffrent when you experiance it first hand in baking this cake than you do the reading. My first chiffon rise beutifully in the oven, but when i took it out, it sank horribly!!
My second chiffon cake turn out nicely, and i faild to get it out!! SO, i blame the cake tin because i dun really have a chiffon cake tin. I'm desperate to find a chiffon tin and try again. SO, i bought it in e-bay, for about $15 dollar. at the mean time, i read again more information about chiffon cake baking, and i find out that the hardest part is actually the beating of the egg whites part. If you beat for too short, the cake will be desse, but if you beat for too long, it'll be tough and chewy, you have to beat it just right! ( ie: Stiff peak, but when you invert it on the hook, it'll still make a curve shaped). Another tip is also when you fold in the batter with the egg white, must be carefull to use a folding technique, so that the air in the egg white will not escape, resulting in a tough cake. If you can manage these 2, then you'll have soft, cottony chiffon cake, that rise beutifully.
2 weeks later, my chiffon cake tin arrive, and i can't wait till the next day to bake it, and this time, i really put more efford into beating my egg whites and folding the yolk to the white mixture. also, i put in extra patience for the cake to cool down before i loosen them out from the tin. Hence, my first chiffon cake was born at 12 am midnight!! yes, it was soft, cottony and rise so tall and proudly!

Pandan Chiffon Cake

Ingrediant:
  • 100g cake flour
  • 1 tsp baking powder
  • 1tbsp pandan paste
  • 100ml coconut milk
  • 4 egg yolks
  • 50ml corn oil ( i use conola oil)
  • 5 egg whites
  • 1/4 tsp cream of tartar
  • 100g castor sugar
  • pinch of salt
Method:
  1. Preheat oven at 170 degree celcious.
  2. Combine egg yolks, 50g sugar, oil, pandan paste, salt, and coconut milk together. Whisk them up using a electric mixer until all incoporated.
  3. Sift cake flour and baking powder for at least 3 times, and then fold them into the yolk mixture.
  4. In a clean bowl, beat egg whites and cream of tartar on high speed until foamy, gradually add 50g of sugar, continue beating until stiff. To check if egg white is ready, take the hook of the mixture out and invert it, if the egg whites attach to the book form a curve loope, but not falling down, it's ready.
  5. Add 1/3 of the white into the yolk, to loosed the yolk. then, gradually fold the rest of the egg white into the yolk mixture. Fold until just combine.
  6. Pour the batter into the ungrease chiffon cake tin ( 18cm ), and bake for 1 hour.
  7. invert the cake immediately and leave it to cool for at least 2 hour in winter, and more in warmer weather. ( in hot weather, it is best leave it overnight to cool down completly)
  8. Run a knife around the edge of the cake tin to loosed it, the cake should fall away easily.

I'm very happy with the result of my chiffon cake.


Soft Cottony texture


It's also very fragrance because of the pandan! Yamm!!


The cake rise high and tall.


Friday, September 5, 2008

The dose of antioxidant


When i first look at the recipe book of Bill Granger, i was drooling over this blueberry crumble cake, magnificant toping and all the goodness of blueberry. So, i decided to make it at a friends' place seeming it was actually a very easy cake.
But for some weird reason, the crumble sink into the middle of the cake, although the overall cake was nice, in fact, too nice. Hence, i decided to try it again at home, and i alternate the crumble recipe a little bit, adding oats and almond. This time my crumble turn out to be glorious, crunchy and yummy. I love the buttercake below too, the sour cream make this cake stay moist. Blueberry also add to a lot of flavour. I think it will work well with any berries, but blueberry is my fav.

Blueberry Crumble Cake


For the Crumble ingrediant:
  • 2 tbsp plain flour
  • 25g oats
  • 25g butter, chilled and cut into very small pieces
  • 1/4 cup brown sugar
  • 1/4 cup flake almond
  • 2 punnets of blueberry

Combine everything together and set aside.

For the Cake ingrediant:

  • 2 cups Plain Flour
  • 2 tsp baking powder
  • 125g butter, soften
  • 1 tsp vanilla extract
  • 2 eggs
  • 1cup sour cream
  1. Preheat oven to 180 degree celcius. Grease and line a 23cm spring foam pan with baking paper.
  2. Cream butter and sugar in a saperate bowl using hand/electric mixer, until combine.
  3. Beat in eggs, one at a time, continue beating until combine.
  4. Gently fold in sieved flour, alternating with the sour cream.
  5. Pour mixture into the prepared pan, and smooth the top with the spatula.
  6. Sprinkle crumble mixture on top of the cake, and bake in preheated oven for about 1 hour or until cooked.
it is best serve warm from the oven, with dallop of cream or ice-cream. But i find it delicious to eat the next day too. Just reheat in the microwave.


i likethe part where the berries ooze into the cake...yam!

Monday, August 11, 2008

love your vegies?


I have baking a lot more savoury stuff in the kitchen lately.
That is because i have been replacing all the dinner meal with these little slices, that little pies...and yes, they do make good dinner slice, with a salad, and you can even pack the left over for luncheon the next day. They're very healthy too ( i suppose, with zucchinies!! ).
There are a lot of zucchini slice recipe if you just happens to gooled for one, and i have tested a lot of them from friends too, some are more fritatta like, some are more quiche like, this version is more 'cake' like, and it can be easily slice in to diffrent sizes, serve warm or cold.


Zucchini Slice

5 eggs
150g (1 cup) self-raising flour, sifted
375g zucchini, grated
1 large onion, finely chopped
200g lite ham, roughtly shredded
1 cup grated lite tasty cheese
60ml (1/4 cup) conola oil

  1. Preheat oven to 170°C.
  2. Grease and line a 30 x 20cm lamington pan.
  3. Beat the eggs in a large bowl until combined.
  4. Add the flour and beat until smooth, then add zucchini, onion, ham, cheese and oil and stir to combine.
  5. Pour into the prepared pan and bake in oven for 30 minutes or until cooked through.
  6. Cut them in squares or slices, serve wam or cold.

Because i didn't have a large enough pan, and i end up with some batter, so i bake them in this little flower sillicon cups! yam!

Saturday, August 9, 2008

Winter Warmer


The only good thing about winter is that we got to eat warm and hearty dessert. This pudding cake is incredibly wonderful, and it's very grown up taste. It is not sickly sweet like some pudding cake, it has got chocolate, and a slight orange bitter tang that makes it so special. It is adapted from Nigella Lawson's How to be a domestic goddess, and from the moment i read it, i just want to make this cake. I love orange and chocolate, i think the combination of the 2 is heavenly. Of course, if you dun like marmalade, you can substitute it with any other jam, like apricot. Of course, it will taste entirely different with a different jam, but it won't be too bad. Worth a try i would say!


when just came out of the oven, the tangy orange aroma of the pudding cake just make you drooling ***
and the best part, you dun have to wait for it to cool down completely, it's best serve warm, with very cold custard.


Orange Blossom Chocolate Pudding

125g unsalted butter
100g dark chocolate buttons
300g thin-cut marmalade
2 tbsp orange blossom water
120g caster sugar
pinch of salt
2 eggs, lightly beaten
150g SR flour

  1. Preheat oven to 180 degree Celsius
  2. Grease and line a 20cm spring foam tin
  3. Melt butter and chocolate in a bowl, over a saucepan of simmering water, stir it gently with a metal spatula, and remove from heat when melted. Cool slightly.
  4. Add marmalade, sugar, and a good pinch of salt. Combine everything.
  5. Gently add in the beaten eggs with the spatula.
  6. Sieve flour over the batter, gently fold in.
  7. Bake in preheat oven for about 50 minutes or until cooked. If pudding become brown too quickly in the oven, cover it with a piece of foil for the last 10 mins of baking.
  8. Cool for 10 mins in the pan, remove cake, slice and serve with orange custard.

Orange custard

Sure you can make your own custard, but I'm lazy and i use store-bought pouring custard. For orange custard, just mix in 1 tbsp of orange liqueur like Cointreau. If your guess includes kids, then just leave the Cointreau and use 1 tbsp of Orange Blossom Water instead!


Friday, August 8, 2008

Pizza in a cup

I love baking muffins, they're easy to bake, often involved only 1 bowl and 1 spatula, hence the easy clean up, easy on the mouth, easy on the wasite line...( IF, you pick the right one, or else muffins can be very very distructive on the waisteline!). And, they can be either savoury or sweet. We make pizza the other night, and there are bits and pieces of left over pizza's topping in the fridge that i really wanted to get rid. Hence, i came across this savaury muffin from www.taste.com.au, and make some modification to clean up my fridge!! haha! They look cute, taste great, and it's the perfect finger food for a party crowd!


Pizza Muffins

11/4 cups SR flour

1 egg, lightly beaten

1/2 cup milk

60g butter, melted, cool slightly

75g shave lite ham, chopped

1/2 cup lite tasty cheese

24 small pieces of canned pineapple, drained.

  1. Preheat oven to 200 degree celcius. Grease and line two 12 hole mini muffin pan with paper cases.
  2. Sieve flour into a bowl, whisk in egg, milk, and melted butter. Stir until combine. Becareful not to stir too much as it is the coarse mixture that produce a light and fluff muffins!!
  3. Add in ham and cheese.
  4. Spoon one big tablepsoon of batter into prepared pan, and top with one small piece of pineapple each.
  5. Bake in preheated oven for about 15 mins, or until golden.
  6. Serve warm, with tomato sauce or just as it is!

They're so yummy it's gone in a second!

Go Banana

I dunno when have i develop a love for banana bread. Particullary, served toasted with a dash of honey and butter. I have been baking and testing a lot of banana bread recipes, this is by far, the best recipe ever, with dates and pecan nuts added to it. It calls for wholemeal flour, but still comes out of the oven moist, and soft. It's just plain wonderful, and i look fwd to have it for breakfast every saturday! The only downside of me not having banana bread every weekend is that the banana don't seems to be over-ripen during this god forshaken winter cold!! Sigh***

Banana Date and Pecan Bread

125g low fat spread
1 cup brown sugar
3 eggs
1 ½ cups wholemeal self raising flour
½ teaspoon ground cinnamon
½ teaspoon ground nutmeg
1 cup mashed bananas (about 3 bananas)
½ cup coconut
½ cup low fat milk or buttermilk
1/3 cup chopped pecans
1/3 cup chopped dried pitted dates

  1. Preheat oven to moderate 180C. Lightly grease a 10 x 20cm loaf pan.
  2. In a large bowl, cream spread and sugar together using an electric mixer, until creamy. Add eggs one at a time, beating well after each addition.
  3. Sift flour and spice together, returning husks to mixture. Fold into creamed mixture with bananas, coconut, milk, nuts and dates. Spoon into prepared pan.
  4. Bake for 50-60 minutes until cooked when tested with a skewer. Cool in pan and turn out onto a wire rack to cool completely.
  5. Serve sliced plain or toasted. Store in an airtight container or wrap and freeze.

( recipe adapted from Everyday Food Mag )


Easy Peasy

This is probably the easiest cookies that i bake.
The best thing is that, it has no flour, no butter, and no egg yolk, but taste moist and moreish!
You can either make a almond one or a coconut one, i like the almond one ( the one infront ), and my husband loves the coconut one ( the one at the back ), well, there is something for every taste buds!!

Almond and Coconut Macaroons
110g Almond meal
75g Caster sugar
1 egg whites, lightly beaten
  1. Preheat oven to 180 degree celcius
  2. Place almond meal, sugar and egg whites in a bowl, stir to combine. Mixture should be firm, and slightly sticky.
  3. Roll mixture into small ball, and flatten with the back of a fork.
  4. Place balls 2cm apart on a baking tray, and bake for about 10 mins, or until golden.
  5. Cool, and serve.

( substitude same amount of almond meal with dessicated coconut for coconut macaroons)

Wednesday, August 6, 2008

Suprise Marriage


I love pistachio! The buttery, salty taste just linger in yuor mouth and you just can't stop eating them once you start. The only downside being i'll almost always end up with sore finger tips or broken nails, because some of the shells can be too stubborn to cracks. God knows how sore my fingers are for making this cake, as i'm not prepared to pay for the triple price of the "nude" one! heheh!
This recipe is actually adapted from Nigella Lawson How to be a domestic Goddess.
It was a suprise that chocolate and pistachio make such a good combination, the colour and the taste of this cake is devine, nutty, chocolaty, pitachy...you just have to try it. You can either make it into a marble cake, or 2 layer cake, as i did. But somehow, my chocolate layers didn't stick to it's layer and mix with the green pistachio layer, oh well, it doesn't bother me as it looks nice and taste great!


Chocolate Pistachio Cake

Chocolate Batter

135g AP flour
1 tsp baking powder
1 tsp baking soda
75g butter, soften
125g sugar
2 eggs, lightly beaten
3/4 cup natural yoghurt
1tsp vanilla extracts
2 tbs cocoa powder
1 cup chocolate chips
Oven preheated to 180 degree celcius


  1. Beat butter and sugar until light and fluffy
  2. Beat in eggs, one at a time
  3. Add in yoghurt and vanilla, continue to cream the mixture until combine
  4. sift flour, baking powder, baking soda and cocoa over the butter mixture, fold the dry ingrediant over the butter mixture until combine.
  5. pour chocolate batter in a 25cm spring foam pan, scatter chocolate chip on top, and set aside while making the pistachio batter.


Pistachio Batter

135g AP flour

1 tsp baking powder

1 tsp baking soda

75g butter, soften

125g sugar

2 eggs

3/4 cup natural yoghurt

1 tsp vanilla extracts

1/3 cup shelled pistachio, finely chopped

  1. Beat butter and sugar until light and fluffy
  2. Beat in eggs, one at a time
  3. Beat in the natural yoghurt and vanilla extracts
  4. sift flour, baking powder and baking soda over the butter mixture, gently fold until well combine.
  5. Fold in the chopped pistachio. Enjoy the green colour of the batter!!
  6. Pour the pistachio batter on top of the chocolate mixture.

Bake in preheated oven 180 degree celcius for 50mins, or until cooked.

With such a devine taste of this cake, who can stop at just one piece?


For that special occasion

The wave of baking cupcakes is high in sydney, so is in my household.
Every occasion that you can think of, be it weddings, birthdays, anniversary...more and more people choose cupcakes over the traditional cake. I came acroos this elegant little cupcakes, suitable for a wedding, and my hand just start to itch and i have to bake them, even though, there are no occasion at the moment! I can't say it's a piece of cake for making them, but they're not that hard either, just more work because these little cakes contain some suprise in them.
They taste heavenly and if you like greentea like i do, you'll love them!

Green tea suprise capcakes

For the cakes:

115g butter, soften

1/2 cup caster sugar

1/2 tsp vanilla extract

2 large eggs, lightly beaten

11/2 cups SR flour, sifted

145ml milk

  1. Preheat oven to 200 degree celcius
  2. Line a 12 hole muffin pans with paper cases
  3. Beat butter, sugar and vanilla with an electric mixer until light and fluffy
  4. Gradually beat in eggs.
  5. Add half the flour, and fold it into the egg mixture with a spatula, add half the milk.
  6. Alternate the addition of flour and milk into egg mixture, until just combine.
  7. Divide mixture evenly into the 12 paper cases, bake for 15-18 mins.
  8. when tested with the skewer, it should come out clean.
  9. Allows the cake to cool complelty, before doing any decoration.

* this is a basic vanilla flavoured cupcake base, suitable to add any decoration or filling*

For a Greentea cupcakes, i filled it with greentea bubble cream

Greentea bubble cream

1/4 cup sago

1 cup milk

1/2 can coconut milk

pinch of salt

1 egg yolk

1/4 cup caster sugar

2 tsp matcha ( greentea powder )

  1. Cooked sago following packet instruction, using milk and coconut milk instead of water.
  2. When sago is cooked, it turn translucent.
  3. Whisk egg yolk with sugar and match, gently whisk the green tea mixture into sago.
  4. Continue to simmer on low heat until thickend. Transfer to a bowl

* I make the bubble cream 1 night before i bake the cupcakes, and cooled them in the fridge *

Greentea Frosting

1 cup icing sugar

1 cup double whipping cream

1 tsp matcha

Whisk everything together until thick and spreadable.

To assemble

1. Hold a sharp, pointed knife at a downward angle and cut a round from the top of each cakes.

2. Filled the cut-cakes with bubble cream, and cover the cutted round back into the filled cakes.

3. Frost the cake with frosting.

Cross section of the cupcakes...


Tuesday, August 5, 2008

D is for Delicious and Decandant


I don't think there is anyone who doesn't like chocolate and peanut butter, they are the perfect comfort food in the world. So when i came across this recipe from taste.com.au, i just wanted to give it a try. The brownies is dense, moist, and the sweetness is completely balanced out by the saltiness of the peanut butter! It's simple and easy, the only trick is to use the best and darkest chocolate you can lay your hands on.

Peanut Butter Chocolate Brownies


150g fine, dark chocolate
100g butter, unsalted, melted
1 cup caster sugar
1/2 cup plain flour
2 tbsp cocoa powder
2 eggs
3/4 cup crunchy peanut butter

  1. Preheat oven to 160 degree celcius
  2. Brush and line a slap pan
  3. Melt chocolate and butter in a large heatproof bowl, over a saucepan of smimmering water
  4. Stir the chocolate butter mixture with a metal spatula, until combine and smooth. Set aside to cool to room temperature.
  5. Combine sugar, flour and cocoa powder in another bowl, add the cooled chocolate mixture and eggs, mix until just combine.
  6. Pour into prepared pan.
  7. Warm the peanut butter a little in the microwave until it's spreadable. Spoon soften peanut butter over brownies mixture, and use a skewer to create swirls.
  8. Bake in the oven for 35-40 mins, or until cooked. ( when tested with skewer, only a little moistcrumbs cling on it ).
  9. Cooled completely in the pan, and when cooled, remove from pan, and cut into squares.


The swirl pattern of peanut butter and chocolate on the top view of the brownies.


Little Blue Gems


Best breakfast in the world, and full of antioxidant! I particularly like to use fresh berries in this muffins as i like the colour when they "bleed". You can use any berries you like, and i find these muffins taste even nicer the 2nd day, reheated in the microwave. Somehow it will absorb more flavour.


Blueberry muffins

2 cups SR flour
3/4 cup brown sugar, firmly packed
300g blueberries ( fresh or frozen )
1 cup buttermilk
1/4 cup vegetable oil
1 egg, lightly whisked.
  1. Preheat oven to 190 degree celcius. Grease and line a 12 hole muffin pan with paper case
  2. Combine the flour and sugar in a large bowl. Toss in blueberries and stir until combine.
  3. Whisk buttermilk, oil and egg in a jug until combine.
  4. Add the wet ingrediant into the dry ingrediant, and mix lightly until combine. Do not over mix.
  5. Filled the paper cases with batter until 3/4 full, and bake in preheated oven for 20-25 mins.
  6. To test the doneness, insert a skewer into the centre of the muffin and it should be clean.
  7. Cool on wire rack, and enjoy warm or cold, plain or with berry jam